Using QAbstractListModel With QML ListView in Qt6
October 8, 2023 • C++ Qt6 QML • 7 minutes to read • Edit
The code can be found at https://github.com/akshaybabloo/qabstractlistmodel-with-qml-listview
This blog is going to be big!
Ever found yourself working on a project, wanting to combine the power of C++ with the flair of a QML ListView? That was me not too long ago. I thought diving into this would be straightforward, but as I dug deeper, I realised there were some gaps in available resources, especially when it came to dynamically handling lists.
After spending a fair amount of time (and maybe a tiny bit of frustration) piecing together how QAbstractListModel meshes with QML ListView, I decided to put together a guide. Not too formal, not too laid-back—just a straightforward walkthrough for anyone wanting to bridge C++ and QML in a dynamic way.
So, in this guide, we’ll explore how to effortlessly sync QAbstractListModel with QML ListView. Whether you’re new to Qt or have some experience under your belt, let’s delve into this together and make our apps a tad bit cooler!
The Basics
Before progressing, it’s important to establish an understanding of the fundamental concepts.
QAbstractListModel: The Data Interface
QAbstractListModel is an integral class in the Qt framework, designed to interface with QML views. Originating from the QAbstractItemModel family, it is specifically tailored to work in conjunction with views such as QListView, QTableView, and QTreeView. Essentially, QAbstractListModel serves as the underlying architecture, facilitating the organisation and display of data in the QML view. It can be likened to a framework that structures and represents the data you intend to display.
QML ListView: A View for Model Presentation
ListView in QML offers a structured view to display model data. By setting its model property, it binds to a data source, facilitating its representation. The ListView supports item-based rendering, flickable content, and provides multiple selection modes, ensuring a versatile and user-friendly experience. However, it’s essential to note that ListView, despite its capabilities, does not allow for nested ListView elements. It’s a dedicated view, designed to represent model data efficiently.
Example Structure
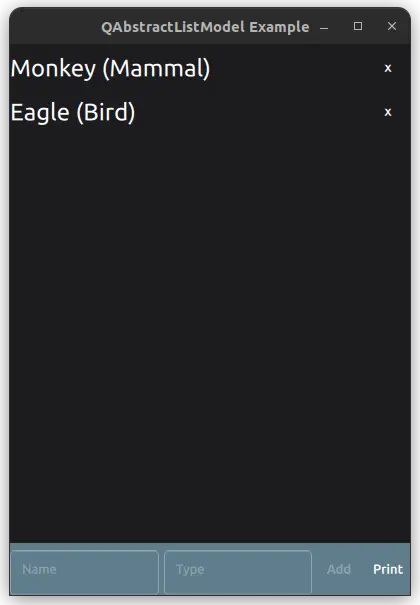
In this walkthrough, we’re constructing a simple QML application. Here’s a step-by-step overview:
- Initialisation:
- Create a QML application.
- Display a list of Animals and their types initialised at the start via C++.
- Model Creation:
- Define a
QAbstractListModelclass in C++ calledAnimalAbstractListModel. - Use this class to populate the list of
AnimalModel.
- Define a
- View Configuration:
- Set up a QML
ListViewelement. - Bind the
ListViewto the previously definedQAbstractListModelclass.
- Set up a QML
- Dynamic List Management:
- Introduce functionality to dynamically add and remove animals from the list.
- Introduce functionality to dynamically add and remove animals from the list.
- Console Interaction:
- Add a button to the application.
- When pressed, the button will print the current list contents to the console.
QAbstractListModel With QML ListView
Here is a sequence diagram of the example application:

Sequence diagram
And the structure of the example application:

Project structure
The Code
AnimalModel
Let’s start with AnimalModel, it’s a simple class that holds the name and type of an animal.
// AnimalModel.h
#include <QObject>
#include <utility>

class AnimalModel {
public:
    AnimalModel(QString name, QString type) {
        m_name = std::move(name);
        m_type = std::move(type);
    }

    const QString &getName() const {
        return m_name;
    }

    const QString &getType() const {
        return m_type;
    }
private:
    QString m_name;
    QString m_type;
};
AnimalAbstractListModel
Next, we’ll define AnimalAbstractListModel, which inherits from QAbstractListModel. This class will be responsible for managing the list of AnimalModel objects.
AnimalAbstractListModel.cpp AnimalAbstractListModel.h
In this there are three overriden methods:
rowCount: Returns the number of rows in the model.data: Returns the data stored under the given role for the item referred to by the index.roleNames: Returns the model’s role names.
There is also a private variable called m_animals which is a QList<AnimalModel>.
// AnimalAbstractListModel.cpp

int AnimalAbstractListModel::rowCount(const QModelIndex &parent) const {
    Q_UNUSED(parent);
    return m_animals.count();
}

QVariant AnimalAbstractListModel::data(const QModelIndex &index, int role) const {
    if (index.row() < 0 || index.row() >= m_animals.count())
        return {};

    const AnimalModel &animalModel = m_animals[index.row()];
    switch (role) {
        case NameRole:
            return animalModel.getName();
        case TypeRole:
            return animalModel.getType();
        default:
            return {};
    }
}

QHash<int, QByteArray> AnimalAbstractListModel::roleNames() const {
    QHash<int, QByteArray> roles;
    roles[NameRole] = "name";
    roles[TypeRole] = "type";
    return roles;
}
The AnimalAbstractListModel class also has four methods:
push: Adds anAnimalModelto the list from QML.remove: Removes anAnimalModelfrom the list, from QML.print: Prints the list to the console.getAnimalsForQML: Returns the list ofAnimalModelas aQVariantListfor QML.
void AnimalAbstractListModel::remove(int index, int count) {
    beginRemoveRows(QModelIndex(), index, index + count - 1);
    for (int row = 0; row < count; ++row) {
        m_animals.removeAt(index);
    }
    endRemoveRows();
}

void AnimalAbstractListModel::push(const QString &name, const QString &type) {
    beginInsertRows(QModelIndex(), rowCount(), rowCount());
    m_animals << AnimalModel(name, type);
    endInsertRows();
}

void AnimalAbstractListModel::print() {
    qDebug() << "\nPrinting from AnimalAbstractListModel::print()";
    for (const AnimalModel &animalModel: m_animals) {
        qDebug() << animalModel.getName() << animalModel.getType();
    }
}

QVariantList AnimalAbstractListModel::getAnimalsForQML() const {
    QVariantList animalsList;
    for (const AnimalModel &animal : m_animals) {
        QVariantMap animalMap;
        animalMap["name"] = animal.getName();
        animalMap["type"] = animal.getType();
        animalsList.append(animalMap);
    }
    return animalsList;
}
main.cpp
Now, let’s move on to the main.cpp file. Here, we’ll create an instance of AnimalAbstractListModel and pass it to QML.
// main.cpp

int main(int argc, char *argv[]) {
    QGuiApplication app(argc, argv);

    QQmlApplicationEngine engine;
    QQmlContext *context = engine.rootContext();

    AnimalAbstractListModel model(&app);
    model.addAnimal(AnimalModel("Monkey", "Mammal"));
    model.addAnimal(AnimalModel("Eagle", "Bird"));

    context->setContextProperty("animalModel", QVariant::fromValue(&model));

    QObject::connect(&engine, &QQmlApplicationEngine::objectCreationFailed,
                     &app, []() { QCoreApplication::exit(-1); },
                     Qt::QueuedConnection);
    engine.loadFromModule("qabstractlistmodel-with-qml-listview", "Main");

    return app.exec();
}
Main.qml
Now, let’s move on to the Main.qml file. Here, we’ll create a ListView and bind it to the AnimalAbstractListModel instance we created in main.cpp.
import QtQuick
import QtQuick.Window
import QtQuick.Controls
import QtQuick.Layouts

ApplicationWindow {
    width: 400
    height: 550
    visible: true
    title: qsTr("QAbstractListModel Example")

    PrintService {
        id: printService
    }

    // Footer with input fields and buttons
    footer: ToolBar {
        RowLayout {
            anchors.fill: parent
            TextField {
                id: nameField
                placeholderText: "Name"
                clip: true
                Layout.fillWidth: true
            }

            TextField {
                id: typeField
                placeholderText: "Type"
                clip: true
                Layout.fillWidth: true
            }

            ToolButton {
                text: "Add"
                enabled: nameField.text.length > 0 && typeField.text.length > 0
                onClicked: {
                    animalModel.push(nameField.text, typeField.text)
                    nameField.text = ""
                    typeField.text = ""
                }
            }

            ToolButton {
                text: "Print"
                onClicked: {
                    console.log("-------------------------------------------")
                    animalModel.print()
                    printService.print(animalModel.getAnimalsForQML())
                }
            }
        }
    }

    // List of animals and their types
    ListView {
        model: animalModel
        anchors.fill: parent
        delegate: RowLayout {
            width: parent?.width
            Text {
                text: name + " (" + type + ")"
                font.pixelSize: 24
                color: "white"
            }
            Item {
                Layout.fillWidth: true
            }
            ToolButton {
                text: "x"
                onClicked: {
                    animalModel.remove(index)
                }
            }
        }
    }
}
animalModel is the instance of AnimalAbstractListModel that we passed from main.cpp. The ListView is bound to this instance. The delegate is a RowLayout with a Text element, an Item element, and a ToolButton element. The Text element displays the name and type of the animal. The Item element is used to fill the remaining space. The ToolButton element is used to remove the animal from the list.
The ToolBars element is used to add animals to the list and print the list to the console.
PrintService
The PrintService is a simple class that prints the list of animals to the console.
// printservice.h

class PrintService : public QObject {
    Q_OBJECT
    QML_ELEMENT
public:
    explicit PrintService(QObject *parent = nullptr) {}

    Q_INVOKABLE static void print(const QVariantList &animalsList) {
        qDebug() << "\nPrinting from PrintService::print()";
        for (const QVariant &var: animalsList) {
            QVariantMap animalMap = var.toMap();
            qDebug() << animalMap["name"].toString() << " " << animalMap["type"].toString();
        }
    }

};
QML_ELEMENT is used to register the class as a QML type. Q_INVOKABLE is used to make the print method available to QML.
Conclusion
Integrating C++ with QML using QAbstractListModel allows for a seamless blend of the fast, low-level capabilities of C++ with the high-level, user-friendly interface design possibilities of QML. Throughout this tutorial, we’ve walked through the creation of an example application that demonstrates this integration, showing not only how to create a QAbstractListModel in C++, but also how to manipulate and display it in QML.
The ability to leverage both C++ and QML in a single application provides developers with a powerful toolkit. Whether it’s for creating performant backends with C++ or designing fluid, interactive frontends with QML, the combination is potent.
If you’re just starting out with Qt, remember that practice is key. Try expanding upon the example given, perhaps by adding more functionality or integrating more complex data types. The more you experiment, the more comfortable and skilled you’ll become.
Thank you for joining me in this exploration. I hope you’ve found it informative and that it aids you in your future Qt development projects. If you have any questions, comments, or insights, please feel free to share. Happy coding!
